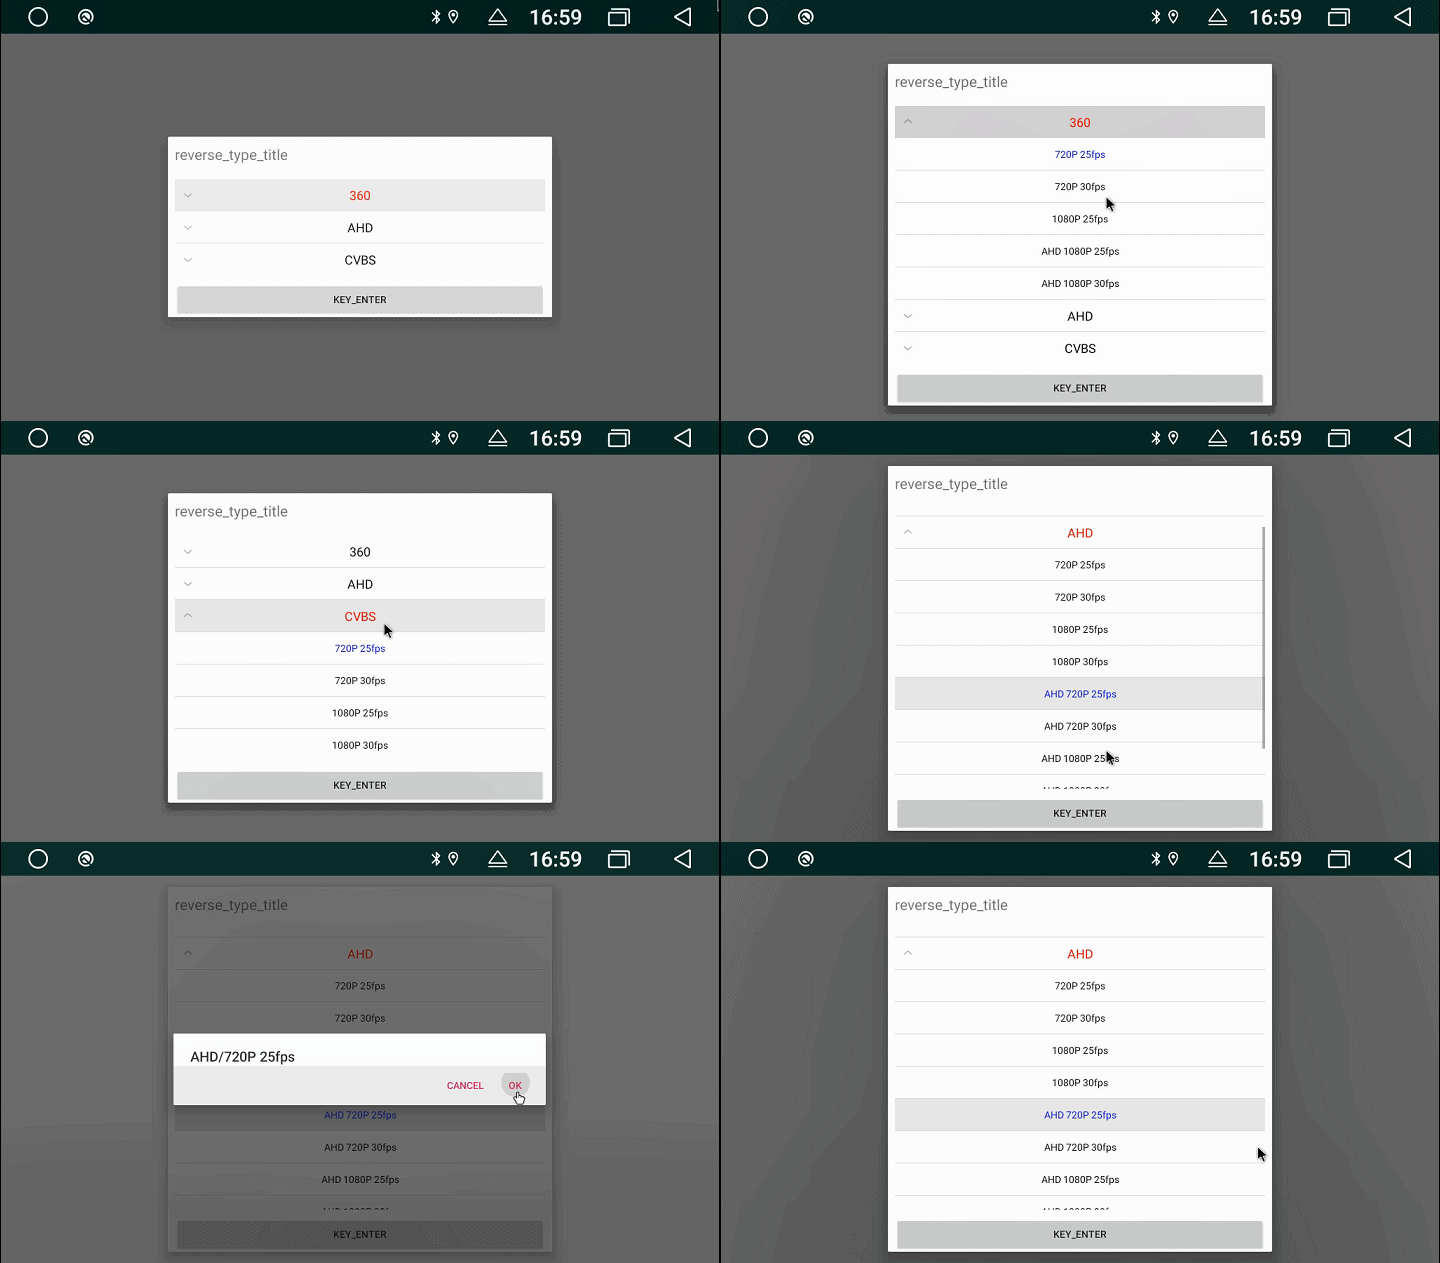
二级选择框使用笔记

一.效果图

二.代码位置

  • XTester-Dialog
    此文是在此基础上做的讲解,用于加深印象

三.主要方法及监听器

  • collapseGroup( int position)
    收起 position 位置的分组

  • expandGroup(int position)
    展开position位置的分组

  • isGroupExpanded(int position)
    判断position位置的分组是否展开

  • setAdapter(ExpandableListAdapter adapter)
    给ExpandableListView 设置适配器

  • setOnChildClickListener(OnChildClickListener listener)
    设置分组中子条目的点击监听器

  • setOnGroupClickListener(OnGroupClickListener listener)
    设置分组的点击监听器

  • setOnGroupCollapseListener(OnGroupCollapseListener listener)
    设置分组收起的监听器

  • setOnGroupExpandListener(OnGroupExpandListener listener)
    设置分组展开的监听器

四.几个XML属性

  • android:groupIndicator
    组指示器,取值可以是任意的Drawable对象。显示在 该分组的最左侧。如果不设置的话,默认是一个向下的箭头,点击展开内容之后会变成向上的箭头

  • android:childIndicator
    子条目指示器,取值可以是任意的Drawable 对象。显示在分组中的每一个 子条目 的最左侧。没有默认图标。

五.用法

  • 首先要准备好要填充的一级列表的的数据和对应的二级列表数据
    demo一级列表一共是三个选项
    所以会有三个子选项的选项集合
1
2
3
4
5
6
7
8
9
10
11
12
13
14
15
16
17
18
19
20
21
ParentList = new ArrayList<>();
for (CharSequence ss : getResources().getTextArray(R.array.parent_item)){
ParentList.add((String)ss);
}
ArrayList<String> childLists1 = new ArrayList<>();
for (CharSequence ss : getResources().getTextArray(R.array.child_1)){
childLists1.add((String)ss);
}
ArrayList<String> childLists2 = new ArrayList<>();
for (CharSequence ss : getResources().getTextArray(R.array.child_2)){
childLists2.add((String)ss);
}
ArrayList<String> childLists3 = new ArrayList<>();
for (CharSequence ss : getResources().getTextArray(R.array.child_3)){
childLists3.add((String)ss);
}
ChildLists = new ArrayList<>();
ChildLists.add(childLists1);
ChildLists.add(childLists2);
ChildLists.add(childLists3);

  • 把准备好的一级二级数据传入adapter
1
2
3
4
5
...
mExpandableListView = dialogView.findViewById(R.id.expandablelistview);
final MultistageAdapter moAdapter = new MultistageAdapter(this,ParentList, ChildLists, mParentmValue, mChildValue);
mExpandableListView.setAdapter(moAdapter);
...
  • 监听点击事件
1
2
3
4
5
6
7
8
9
10
11
12
13
14
15
16
17
18
19
20
21
//一级选项点击回调
mExpandableListView.setOnGroupClickListener(new ExpandableListView.OnGroupClickListener() {
@Override
public boolean onGroupClick(ExpandableListView parent, View v, int groupPosition, long id) {
mParentmValue2 = groupPosition;
mChildValue2 = 0;
moAdapter.notifyDataSetChanged(mParentmValue2,mChildValue2); //更新选中状态
return false;
}
});

//二级选项点击回调
mExpandableListView.setOnChildClickListener(new ExpandableListView.OnChildClickListener() {
@Override
public boolean onChildClick(ExpandableListView parent, View v, int reverseTypePosition, int reverseCisPosition, long id) {
mParentmValue2 = reverseTypePosition;
mChildValue2 = reverseCisPosition;
moAdapter.notifyDataSetChanged(mParentmValue2,mChildValue2);//更新选中状态
return false;
}
});
  • 确认框中处理
1
2
3
4
5
6
7
8
9
10
11
12
13
14
15
16
private void showConfirmDialog(){
final AlertDialog.Builder normalDialog = new AlertDialog.Builder(this);
final String value = ParentList.get(mParentmValue2)+"/"+ChildLists.get(mParentmValue2).get(mChildValue);
normalDialog.setTitle(value);
normalDialog.setPositiveButton("OK",
new DialogInterface.OnClickListener() {
@Override
public void onClick(DialogInterface dialog, int which) {
mParentmValue = mParentmValue2;
mChildValue = mChildValue2;
Toast.makeText(getApplicationContext(),value,Toast.LENGTH_SHORT).show();
}
});
...
normalDialog.show();
}

六.常用对话框笔记

常用对话框笔记